Growing ferns from spores is one of the most interesting experiences imaginable, and not at all difficult.
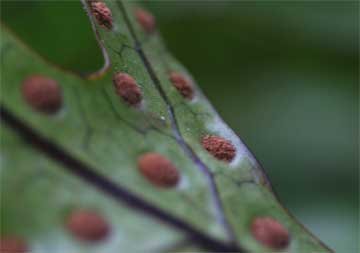
Spores are nature’s way of multiplying ferns, just as seeds are produced to multiply flowering plants. Fern spores are so small that only when they are crowded together are they visible to the eye. They are light or dark brown powder found on the underside of mature fronds.
Some kinds such as the Phlebodiums and Polystichum lonchitis, produce spores in dots – often referred to as fruit dots. In other varieties, Pteris rivertoniana and Pteris longifolia, the sori (spore cases) are found on the edge of the frond. Woodwardia orientalis and Asplenium bulbiferum reproduce by small brown bulbils forming on top of the frond.

Young plants grow from these bulbils and may be removed and planted in a closed container when the second or third fronds appear. They will soon grow into specimen plants. Spores are protected by a thin membrane called indusium. When spores are mature the indusium will break and roll back releasing the spores.
The wind will carry them away so it is best to cover the frond with a paper bag, fasten edges and tie the bag to a stake, so the frond stem will not break off. Protect from rain and wind.
In about ten days remove the bag and you will find it covered inside with brown dust-like powder. These are spores ready to plant.
Planting the Spores
Fresh spores planted immediately after ripening germinate in six weeks to two months. Old dry spores take from six months to one year. I like to use small plastic shoe or sweater boxes with a clear top for germination trays. You can put in drainage holes in the bottom with a small drill. Cover bottom with damp sphagnum moss. Soak moss over night, (when handling sphagnum moss always wear gloves) squeeze all water from moss and fluff by tossing in air a few times (but not like a pizza).
Add crushed charcoal and two inches of damp screened sphagnum moss. Sow spores thinly, place top on and set in a warm, well lighted place to germinate.
Do not let the planting medium dry out. If it is necessary to add moisture place the container in a pan of warm water, using 1/2 inch of water. Remove container from water as soon as moisture shows on top of moss. If you are unable to find screened sphagnum moss at your seed store, make your own by putting damp moss through a sieve.
First signs of germination will be a flat green coat which looks like moss. These are heart shaped bodies, only one cell thick and 1/4 inch wide. On the lower surface of each, numerous water absorbing hairs are formed. They hold the plant in position. This heart shaped body is called prothallus.
A glass case or propagating case is excellent for fern germination. I have two shelves, lighted with two single 48″ inch fluorescent lights for each shelf. In the winter I use a thermostatically controlled heating cable in each shelf. My propagation case stands in a dark basement corner. Aluminum pans were made, three or four for each shelf, to protect the wood. Plastic trays are also excellent. They are easy to handle, and are filled with damp peat moss or coarse vermiculite. The damp moss helps maintain a high humidity that is necessary for spore germination, also for growing seedlings. I also have sliding doors on the case to protect seed, trays and plants from drafts and cold air.

When fronds begin to appear – give the ferns some air by tilting the top of lid and in a week or so remove top. As soon as small fronds are large enough to handle, transplant to plastic containers with a growing medium similar to soil used for African violets. Transplant in clumps of 4 or 5, being sure to allow space between each clump for the tiny roots to form.
For the second transplanting I use 3″ inch pots. Provide plenty of drainage. Again I use the same potting mixture. Fertilize once a month with a good commercial fertilizer, or more often with a liquid food but use both at 1/2 strength. Seedlings like a cool location, good light, even temperature and plenty of moisture.
How New Varieties Arise
New varieties may be obtained by mixing fern spores and sowing in one seed tray. Crossing takes place in the prothallium. Ferns are not flowering plants and cannot be crossed by hand. All ferns that form several crowns may be increased by division. Those with creeping rhizomes may be propagated by layering the points or removing pieces of the rhizomes with roots.
Few insects attack ferns. Scale sometimes becomes troublesome. The spherical and aspidistra scale are related to mealy bugs and feed on the plant sap. One teaspoon of detergent in a quart of water or a spray recommended for fern scale will remove scale from plants. I use a natural product called “neem oil” as an insecticide on most of my plants.
Young scale move around on the plant but soon settle down and remain in the same place. Thrips and red spider may also attack ferns.
Two of the best ferns for house culture are Boston fern (Nephrolepis exalta), and Kimberly Queen fern (Nephrolepis obliterata). Ferns require high humidity and are grown to perfection in greenhouses or terrariums. Ferns will reward you with lush foliage if summered in a shaded garden.
